
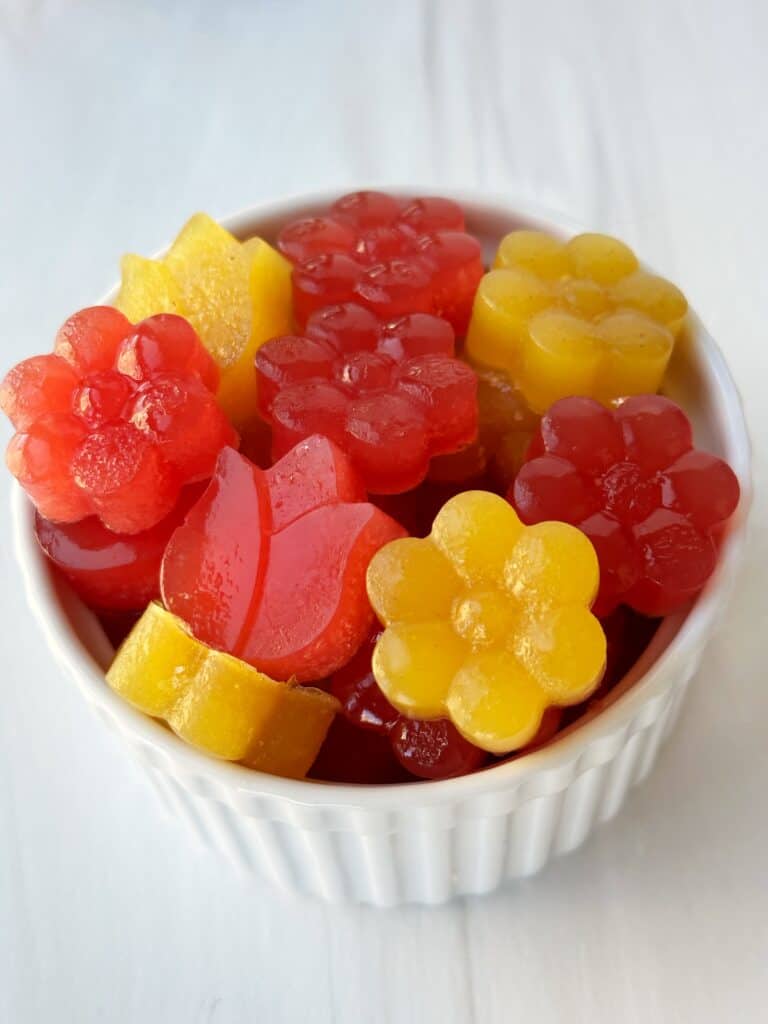
These homemade gummies are a fun and delicious treat that's perfect for spring! These gummies are not only fun to eat, but they are a wholesome alternative to store-bought sweets. Using simple ingredients and a silicone mold, you can create a kid-friendly snack or dessert that's easy to make and packed with health benefits. You can even add a superfood boost if you prefer! I honestly was intimidated to make these gummies at first, but they are super easy! They are also adaptable and customizable and you can use any flavor juice you prefer. I love recipes where you can get creative with the shape and flavor. These gummies only take a few minutes to whip up, the hardest part is waiting for them to set in the fridge! These are perfect for an Easter treat, school snack or sweet pick-me-up! If you love these treats, you will also love my birds nest cookies, avocado cookies and chocolate Easter eggs!
What is Gelatin?
Gelatin is a protein derived from collagen, which is found in the connective tissue of animals. It is known for its ability to form a gel. When mixed with liquid and cooled, it creates a semi-solid gel-like substance. This is perfect for making gummies!
Why You'll Love This Recipe
These wellness gummies are so easy to make!
You only need a few simple ingredients for this recipe.
The flavor options are endless!
This recipe is easy to make gluten free, dairy free and allergy friendly!
They are naturally sweetened with honey.
They are so easy to make!
This recipe is super kid-friendly and a great activity to do with kids.
Equipment Needed
All you need to make these wellness gummies is a pot, spoon, measuring cups and spoons, a dropper and a silicone mold. I used this flower mold from Amazon to make these gummies fun for spring. Feel free to use any shape mold you have on hand!
Ingredients Needed
Juice: I used two different flavors of juice to make multiple colored gummies.
Gelatin: Gelatin is what helps give these gummies their structure and bounciness!
Honey: I used honey to naturally sweeten these wellness gummies!
Peach Cider Vinegar: I added peach cider vinegar in this recipe for added health benefits. You can also use apple cider vinegar.
Step By Step Instructions
Step 1: Gather your ingredients.

Step 2: Combine juice and gelatin in your pot. If you are making two separate flavors you are going to want to have 2 pots going. Let sit for 5 minutes.

Step 3: Cook over low-medium heat until combined, continuously mixing.

Step 4: Use the dropper to transfer the mixture into the silicone molds.

Step 5: Place molds in the refrigerator for 2-3 hours to firm. Enjoy!

Storage
Store these wellness gummies in the refrigerator in an airtight container for up to 5 days.
Variations
Juice: I used juice from a local juice shop in my recipe, but feel free to use any flavor you love!
Sweetener: I used honey to sweeten these wellness gummies, but feel free to use maple syrup, agave or skip the sweetener.
Vinegar: I used peach cider vinegar in this recipe for added health benefits, but feel free to use apple cider vinegar or skip it!
Gelatin: The gelatin is the most important part of this recipe. I try to use high quality gelatin if possible!

How to Serve
Homemade gummies are a versatile treat! Here are some fun and appealing ways to serve them:
- On a Platter: Arrange the gummies on a pretty plate or platter for a colorful presentation!
- In Small Bowls: Serve individual portions in small bowls or cups.
- As a Snack: Keep a container of gummies on hand for a quick and healthy snack.
- Party Favors: Package the gummies in small, decorative bags or boxes for party favors.
- Layered Desserts: Use gummies as a colorful layer in parfaits or other layered desserts.
- Garnish: Use gummies as a garnish for cakes, cupcakes or ice cream.
- Frozen: for a cool treat, freeze the gummies.
- Keep Them Cool: Gummies can become sticky if they get too warm, so store and serve them in a cool place.
Recipe FAQ
How should I store these homemade gummies?
Store these wellness gummies in the refrigerator in an airtight container!
What makes gummies chewy?
The gelatin makes these gummies chewy and gives them texture!
What kind of gelatin is the best?
I like to use high quality gelatin whenever possible!
Can you make these vegan?
I have not tried making these vegan, but there are vegan substitutes for gelatin (like agar agar).
How do you make the flower shapes?
I used a silicone mold to make the flower shapes.
What kind of juice should I use?
You can use any juice you love! Try out apple, orange, grapefruit, pomegranate and more!
Related Recipes
Be sure to try these fun sweet treats next:
Frozen Samoa Rice Krispie Treats
If you make these homemade gummies and love them, I would really appreciate a 5 star review! I also love seeing your creations so please tag me on Instagram or TikTok.
Want to Save This Recipe?
Enter your email & I'll send it to your inbox. Plus, get weekly gluten-free and dairy-free meal ideas and grocery lists delivered straight to your inbox every Friday!
By submitting this form, you consent to receive emails from Less with Laur

Homemade Gummies
Equipment
- 1 pot
- 1 dropper
- silicone molds
Ingredients
- 1 cup fruit juice
- 3 tbsp gelatin
- 1 tbsp honey
- 1 tsp peach cider vinegar
Instructions
- Gather your ingredients.
- Combine juice and gelatin in your pot. If you are making two separate flavors you are going to want to have 2 pots going. Let sit for 5 minutes.
- Cook over low-medium heat until combined, continuously mixing.
- Use the dropper to transfer the mixture into the silicone molds.
- Place molds in the refrigerator for 2-3 hours to firm. Enjoy!

Lauren